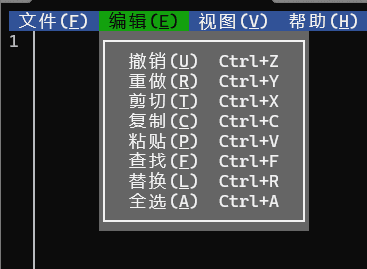
New File:Ctrl+N Open File:Ctrl+0 Save:Ctrl+s Close Editor:Ctrl+W Exit:Ctrl+Q Undo:Ctrl+Z Redo:Ctrl+Y Cut:Ctrl+x Copy:Ctrl+c Paste:Ctrl+V Find:Ctrl+F Replace:Ctrl+R
wget https://github.com/rqlite/rqlite/releases/download/v7.0.0/rqlited-v7.0.0-linux-amd64.tar.gz
tar -xzvf rqlited-v7.0.0-linux-amd64.tar.gz
cd rqlited-v7.0.0-linux-amd64
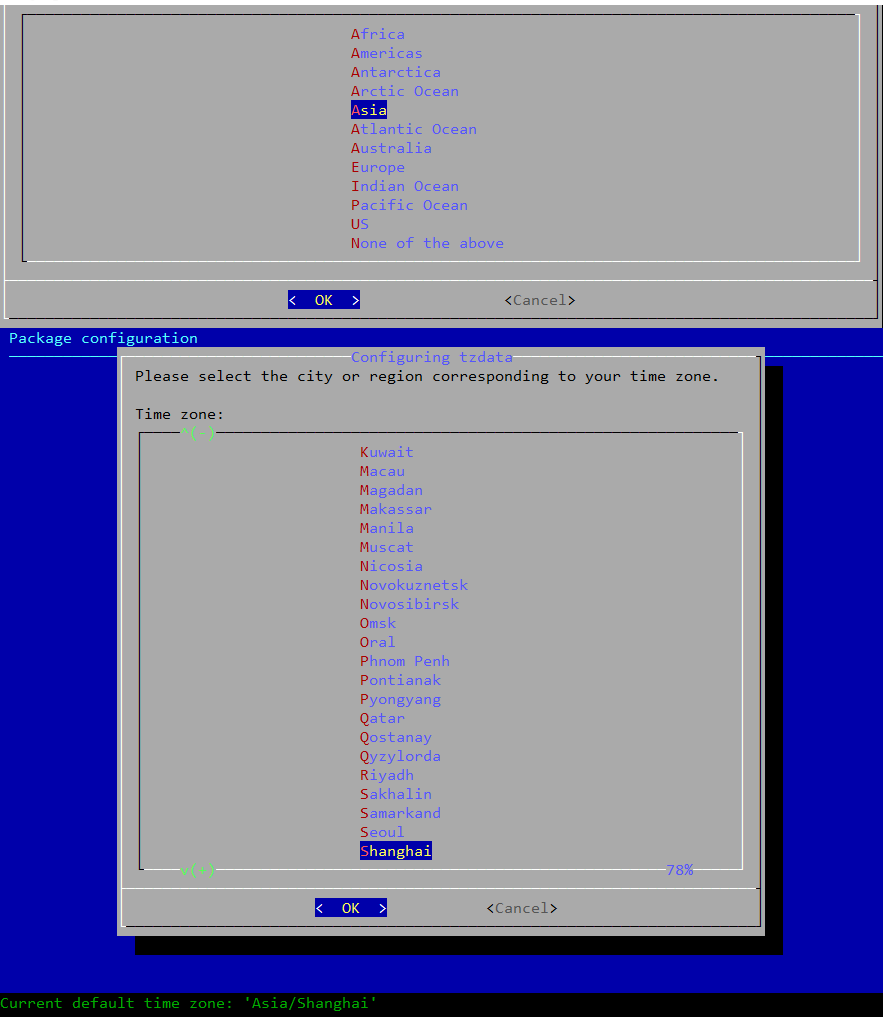
 timedatectl status
               Local time: Sat 2024-09-14 21:56:01 CST
           Universal time: Sat 2024-09-14 13:56:01 UTC
                 RTC time: Sat 2024-09-14 13:55:53
                Time zone: Asia/Shanghai (CST, +0800)
System clock synchronized: no
              NTP service: n/a
          RTC in local TZ: no
timedatectl status
               Local time: Sat 2024-09-14 21:56:07 CST
           Universal time: Sat 2024-09-14 13:56:07 UTC
                 RTC time: n/a
                Time zone: Asia/Shanghai (CST, +0800)
System clock synchronized: no
              NTP service: n/a
          RTC in local TZ: no
% Appropriate date and time representation for date(1). This is % different from d_t_fmt for historical reasons and has been different % since 2000 when date_fmt was added as a GNU extension. At the end % of 2018 it was adjusted to use 12H time (bug 24046) instead of 24H.
failed to fetch https://nginx.org/packages/mainline/debian/dists/bookworm/inrelease the following signatures were invalid: expkeysig abf5bd827bd9bf62 nginx signing key <signing-key@nginx.com>
 # 显示PHP程序的可替换信息
update-alternatives --display php

php - manual mode
  link best version is /usr/bin/php8.3
  link currently points to /usr/bin/php8.2
  link php is /usr/bin/php
  slave php.1.gz is /usr/share/man/man1/php.1.gz
/usr/bin/php8.2 - priority 82
  slave php.1.gz: /usr/share/man/man1/php8.2.1.gz
/usr/bin/php8.3 - priority 83
  slave php.1.gz: /usr/share/man/man1/php8.3.1.gz
#设置默认浏览器
update-alternatives --config www-browser

There is 1 choice for the alternative www-browser (providing /usr/bin/www-browser).

  Selection    Path            Priority   Status
------------------------------------------------------------
* 0            /usr/bin/w3m     25        auto mode
  1            /usr/bin/w3m     25        manual mode

Press <enter> to keep the current choice[*], or type selection number:

#设置默认使用的php版本
update-alternatives --config php

There are 2 choices for the alternative php (providing /usr/bin/php).

  Selection    Path             Priority   Status
------------------------------------------------------------
  0            /usr/bin/php8.3   83        auto mode
* 1            /usr/bin/php8.2   82        manual mode
  2            /usr/bin/php8.3   83        manual mode

Press <enter> to keep the current choice[*], or type selection number: 1
W: An error occurred during the signature verification. The repository is not updated and the previous index files will be used. GPG error: https://packages.sury.org/apache2 bookworm InRelease: The following signatures were invalid: EXPKEYSIG B188E2B695BD4743 DEB.SURY.ORG Automatic Signing Key deb@sury.org
W: An error occurred during the signature verification. The repository is not updated and the previous index files will be used. GPG error: https://packages.sury.org/php bookworm InRelease: The following signatures were invalid: EXPKEYSIG B188E2B695BD4743 DEB.SURY.ORG Automatic Signing Key deb@sury.org
W: Failed to fetch https://packages.sury.org/apache2/dists/bookworm/InRelease The following signatures were invalid: EXPKEYSIG B188E2B695BD4743 DEB.SURY.ORG Automatic Signing Key deb@sury.org
W: Failed to fetch https://packages.sury.org/php/dists/bookworm/InRelease The following signatures were invalid: EXPKEYSIG B188E2B695BD4743 DEB.SURY.ORG Automatic Signing Key deb@sury.org
W: Some index files failed to download. They have been ignored, or old ones used instead.